
How to create an interactive table in R
Interactive tables with seeking and sorting can be a pleasant way of discovering facts. And often, you might want to share that facts with other people — including text-only facts like a listing of Do Additional With R online video tutorials.
But when that facts incorporates a column with pretty extended entries, that column may possibly not suit effectively in a desk the width of your display. This can be specifically tough when not every row incorporates the extremely-vast column. For illustration, a desk of questionnaire results exactly where 1 area is “Do you have any further comments?” Not anyone may possibly.
Which is exactly where a desk with expandable rows can arrive in helpful. At the NICAR facts journalism meeting previously this calendar year, I posted a variety so speakers (and other attendees) could post inbound links to session shows. Some people added further comments others did not. Showing that column by default would waste a whole lot of display true estate.
As a substitute, that remark area displays in my interactive desk of NICAR resources only if a user clicks on the expand-row icon. Not every row can be expanded with a clickable icon at the left of the Subject matter identify simply because not every row has facts in that area, as you can (with any luck ,) see in the screenshot beneath.
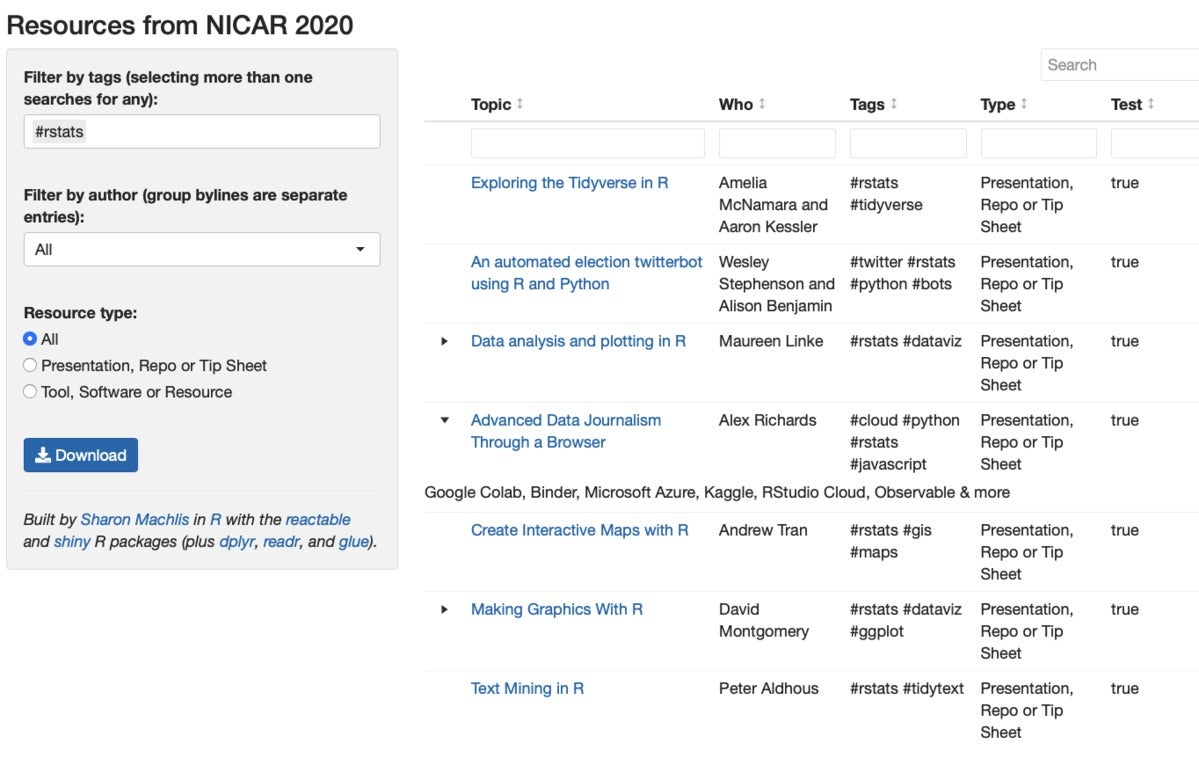 Sharon Machlis, IDG
R-generated desk with some rows that are expandable to screen additional facts.
Let’s see how to make a desk like this.
If you’d like to stick to alongside, set up and load the reactable package deal. For this demo, you are going to also need the rio, glue, htmltools, and dplyr offers put in.
You can obtain the facts I’ll use in this demo from the hyperlink beneath. It’s a tiny (fifteen rows) facts established about R and Python classes at this year’s NICAR meeting.
fifteen rows of facts about R and Python classes at the 2020 NICAR facts journalism meeting Sharon Machlis
Load reactable and dplyr in R
In the code beneath, I load reactable and dplyr and then import my facts applying rio::import().
library(reactable)
library(dplyr)
nicar <- rio::import("nicar.csv")
The facts has columns for the identify of the source (What), the writer (Who), TheURL, Tags, Type, and Feedback.
Following, I want create a new column referred to as Resource with a clickable hyperlink to each and every source. I am just creating a small fundamental HTML applying the What and TheURL columns to make it much easier for customers to get to resources exhibited in the desk.
Then I find the columns I want in the purchase I want them.
nicar <- nicar {36a394957233d72e39ae9c6059652940c987f134ee85c6741bc5f1e7246491e6}>{36a394957233d72e39ae9c6059652940c987f134ee85c6741bc5f1e7246491e6}
mutate(
Resource = glue::glue("What")
) {36a394957233d72e39ae9c6059652940c987f134ee85c6741bc5f1e7246491e6}>{36a394957233d72e39ae9c6059652940c987f134ee85c6741bc5f1e7246491e6}
find(Resource, Who, Tags, Type, Feedback)
Get started with a fundamental reactable table
At last, I create a fundamental, default reactable desk.
reactable(nicar)
And this desk is fundamental. There is no lookup box nonetheless and the Resource column reveals the actual HTML code in its place of displaying as HTML.
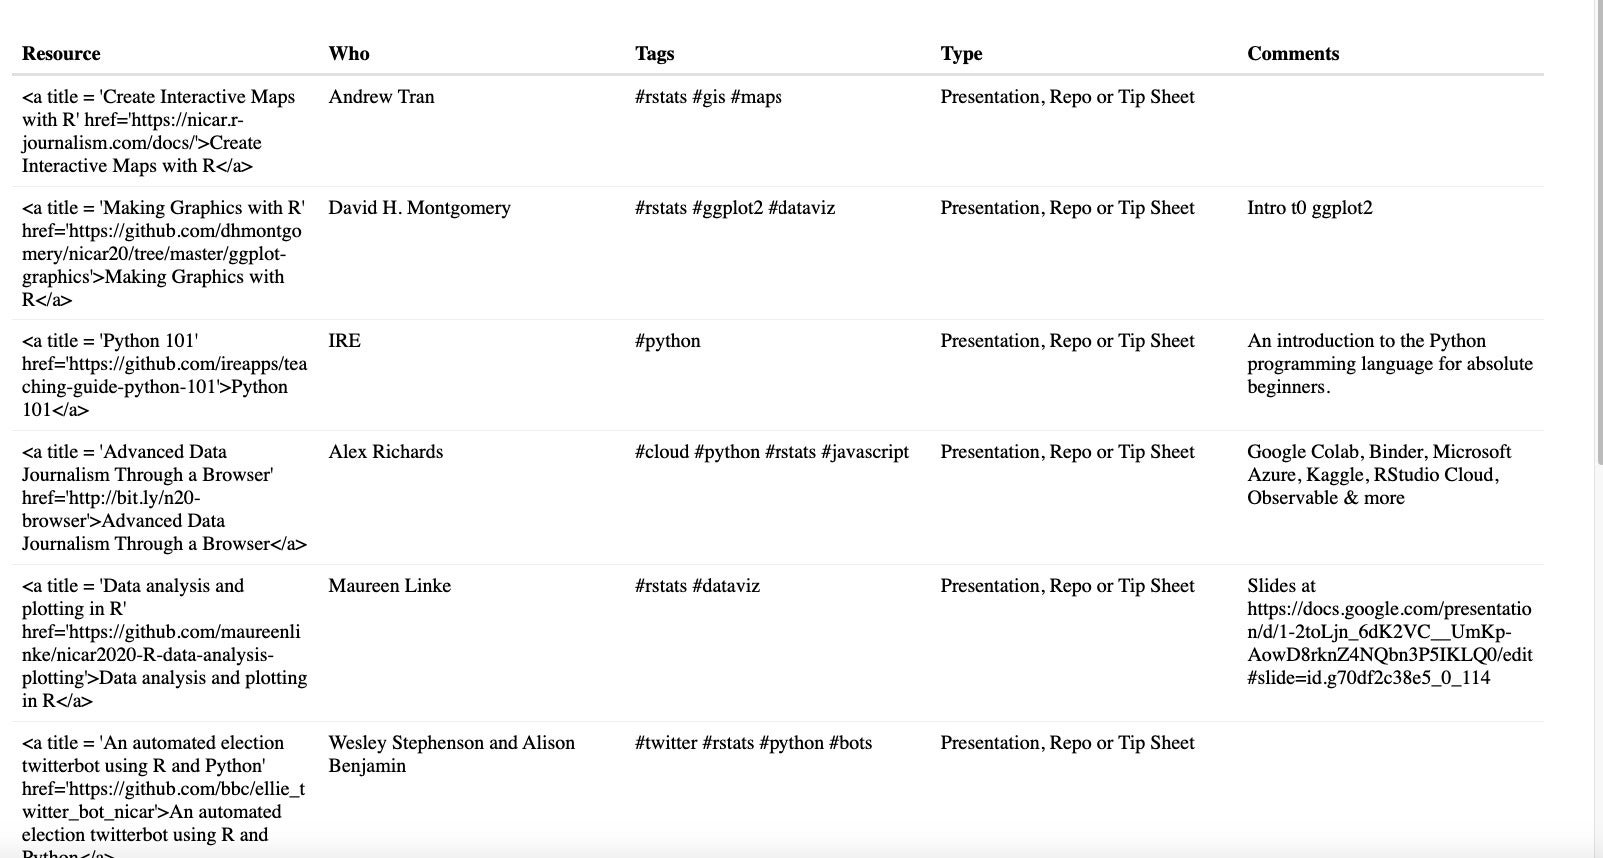 Sharon Machlis, IDG
Default reactable desk with no lookup box and column displaying HTML code in its place of HTML as HTML.
In the next code group, I include a lookup box to the desk and small arrow icons showing that the columns are sortable.
reactable(nicar, searchable = Accurate, showSortable = Accurate, showSortIcon = Accurate)
To notify reactable to screen the Resource column as HTML, I use the columns argument and a listing exactly where colDef sets the attributes of 1 or additional columns. Down below, I’m location html = true for the Resource column so it displays as HTML, and I’m also creating that column resizable.
reactable(nicar, searchable = Accurate, showSortable = Accurate, showSortIcon = Accurate,
columns = listing(
Resource = colDef(html = Accurate, resizable = Accurate)
)
)
To notify reactable not to screen the Feedback column in the main desk, I established colDef(display = Phony).
reactable(nicar, searchable = Accurate, showSortable = Accurate, showSortIcon = Accurate,
columns = listing(
Resource = colDef(html = Accurate, resizable = Accurate),
Feedback = colDef(display = Phony)
)
)
So considerably so superior.
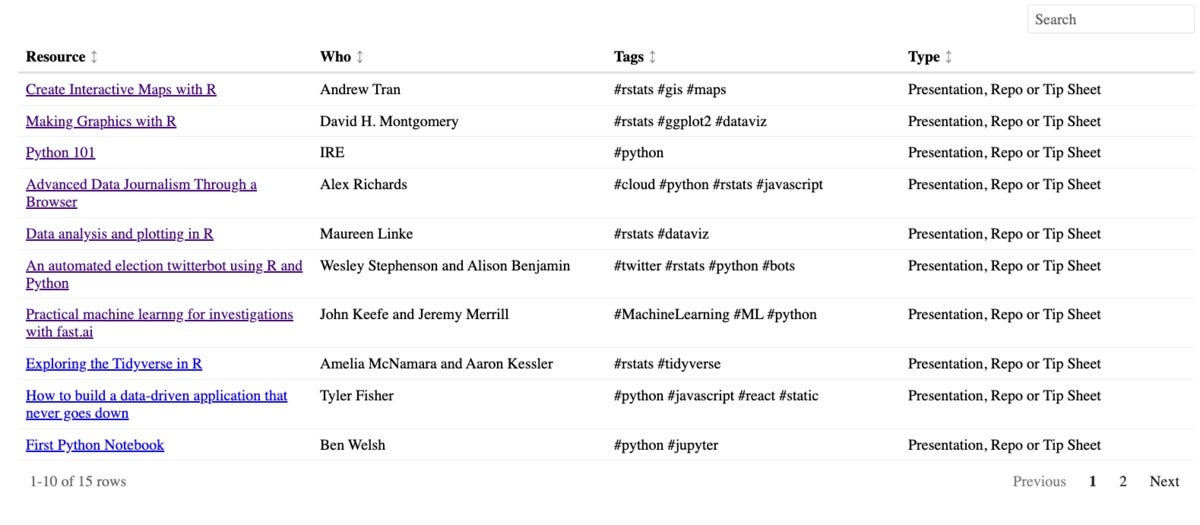 Sharon Machlis, IDG
Reactable desk tweaked to consist of a lookup box, 1 column displaying as HTML, and a further column not showing in the main desk.
Incorporate reactable code for expandable rows
The next move is including the expandable rows, and which is a bit additional advanced:
# Purpose necessary in accordance to Greg Lin, creator of reactable
html <- function(x, inline = FALSE)
container <- if (inline) htmltools::span else htmltools::div
container(dangerouslySetInnerHTML = listing("__html" = x))

reactable(nicar, searchable = Accurate, showSortable = Accurate,
columns = listing(
Resource = colDef(html = Accurate, resizable = Accurate),
Feedback = colDef(display = Phony)
),
# if there exists a remark, make row expandable
specifics = function(index)
if(nicar$Feedback[index] != "")
htmltools::tagList(
html(nicar$Feedback[index])
)


)
I did not produce this element myself reactable creator Greg Lin wrote it. Actually, I don’t understand what every line is doing. But it functions!
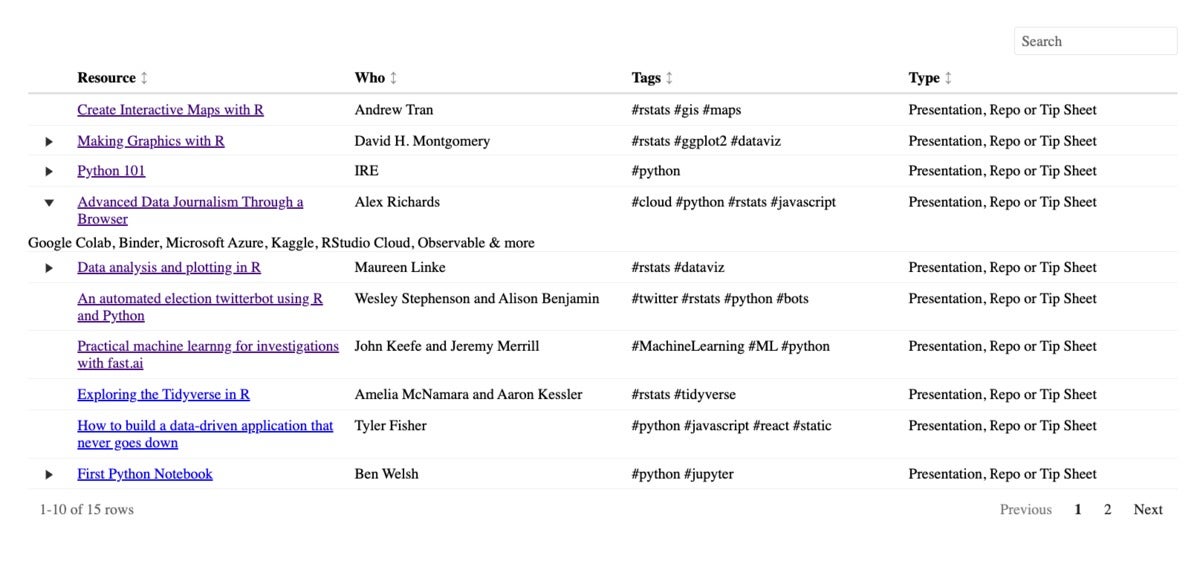 Sharon Machlis
A reactable desk with expandable rows.
Will I bear in mind this code the next time I want to make a desk with expandable rows? No. Absolutely not. But if I make an RStudio code snippet, I don’t have to bear in mind it. It will often be just a few of keystrokes absent.
If you’re not common with RStudio code snippets at all, test out the Do Additional With R episode on code snippets for a total explainer. But below are the principles.
Make an RStudio code snippet
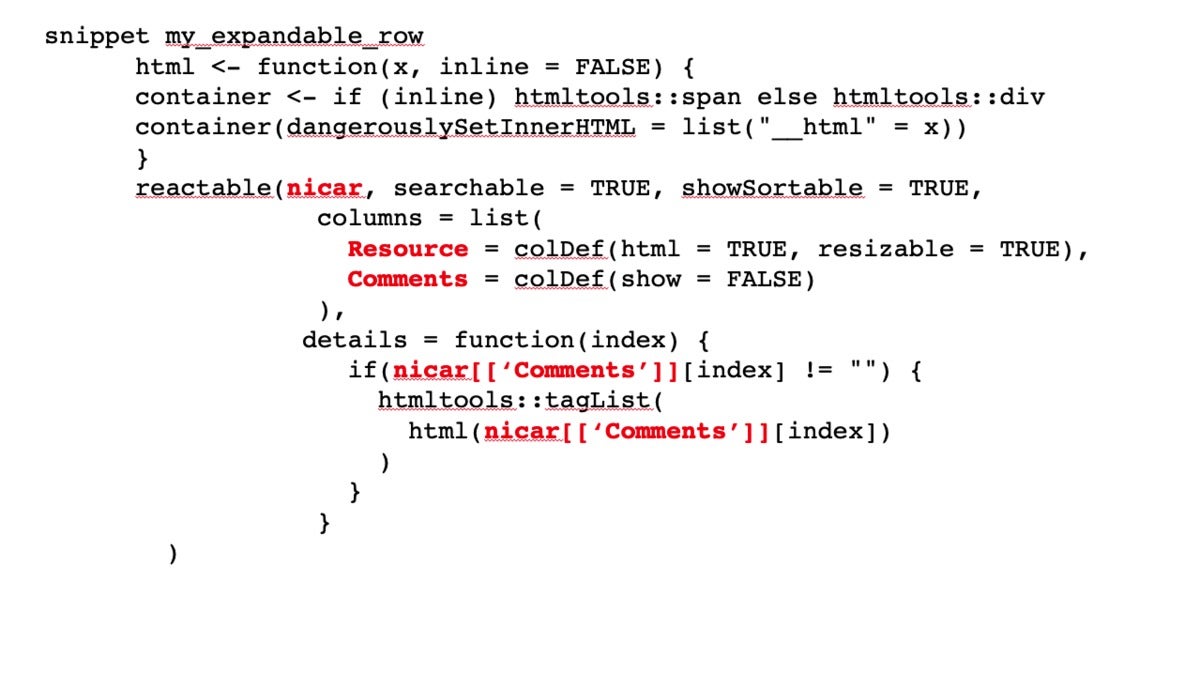
Down below is an image of my desk code highlighting the variables for my facts frame and column names, as effectively as altering the column definition from greenback indication notation to bracket notation (which functions a whole lot far better in snippets). Also — extremely important — I added a snippet title and indented every line of code with a setting up tab. Which is a ought to!
 Sharon Machlis, IDG
Code for my desk with variables highlighted, column syntax modified to bracket notations, and snippet title and indentation added.
Then I just need to adjust each and every variable identify to a generic snippet variable: one for the facts frame, 2 for the column I want to screen as HTML, and 3 for the expandable-row column. Notice the variable syntax: $range:variable_identify. These variables will make it straightforward for me to fill in actual variable names back again in RStudio.
snippet my_expandable_row
html <- function(x, inline = FALSE)
container <- if (inline) htmltools::span else htmltools::div
container(dangerouslySetInnerHTML = listing("__html" = x))

reactable($one:mydf, searchable = Accurate, showSortable = Accurate,
columns = listing(
$2:html_column = colDef(html = Accurate, resizable = Accurate),
$3:expand_col = colDef(display = Phony)
),
specifics = function(index)
if($one:mydf[['$3:expand_col']][index] != "")
htmltools::tagList(
html($one:mydf[['$3:expand_col']][index])
)


)
You can duplicate and paste the snippet code over into your individual RStudio snippets file applying
usethis::edit_rstudio_snippets()
to open up the snippets file in RStudio. Make confident the snippet code quotations are simple quotations and that each and every line is indented with a tab (not just spaces a setting up tab for each and every line of code is mandatory).
Now if you form the identify of the snippet in an RStudio source R script file, it ought to expand to give you the code. You can then form the identify of the first variable, hit tab, form the identify of your 2nd variable, and so on. Examine out the online video embedded in this short article to see how this functions. And delight in your individual interactive tables with expandable rows!
For additional R ideas, head to the InfoWorld Do Additional With R web site.
Copyright © 2020 IDG Communications, Inc.


